Google Funding Choices – Consent Mode v2 Setup Guide
Overview
If you are using Google Funding Choices as your Consent Management Platform (CMP), it is important to ensure that your website is configured correctly for Google Consent Mode v2.
A proper setup ensures that:
- data is collected only after user consent,
- duplicate tracking issues are avoided,
- and the website remains GDPR compliant.
1. Verify Existing dataLayer
Before adding the Consent Mode snippet, first check whether a dataLayer is already defined on the page or through Google Tag Manager (GTM).
In many implementations, the dataLayer is already initialized by existing Google tags, plugins, or integrations. It should not be declared multiple times.
If a dataLayer already exists, only add the Consent Mode snippet immediately after it.
Incorrect ordering or duplicate dataLayer declarations may affect the proper operation of Google tags and Consent Mode.
2. Add the Consent Mode Default Snippet
The Consent Mode default snippet must:
- be placed inside the
<head> - appear before any Google tags
- initialize all consent signals as
deniedby default
Example implementation:
<script>
  window.dataLayer = window.dataLayer || [];

  function gtag() {
    dataLayer.push(arguments);
  }

  gtag('consent', 'default', {
    'ad_storage': 'denied',
    'ad_user_data': 'denied',
    'ad_personalization': 'denied',
    'analytics_storage': 'denied',
    'wait_for_update': 500
  });

  gtag('js', new Date());
  gtag('config', 'G-XXXXXXXXXX');
</script>
All consent parameters are initialized as denied by default, meaning that no data is collected until the user provides consent.
Google Funding Choices automatically updates the consent state after the user interacts with the consent banner.
3. Important Considerations
Google Tag Manager (GTM)
If you are using Google Tag Manager, the Consent Mode implementation may already exist there instead of being hardcoded on the page.
In this case:
- verify that the Consent Mode tag exists,
- and ensure that it fires using the Consent Initialization trigger.
Do not implement the Consent Mode snippet both:
- directly in the page source, and
- inside GTM
at the same time.
This may result in duplicate consent initialization and unpredictable behavior.
Avoid Duplicate gtag('config')
Avoid triggering gtag('config') multiple times (for example from both hardcoded code and GTM simultaneously).
Duplicate configurations can cause:
- duplicate
page_viewevents, - inaccurate Google Analytics reporting,
- and inconsistent tracking behavior.
Universal Analytics (UA) Deprecation
If your website still uses Universal Analytics IDs (UA-XXXXX), they should be replaced with Google Analytics 4 IDs (G-XXXXX).
Universal Analytics has been officially discontinued by Google and no longer processes data.
Google Analytics 4 (GA4) is now required for proper support of:
- Consent Mode v2
- Google Funding Choices
- Modern Google Ads integrations
4. Google Ad Manager / Google AdSense Privacy & Messaging Setup
There is additional configuration required in the Privacy & Messaging settings to ensure Consent Mode v2 operates correctly.
Depending on where your GFC is implemented (Google Ad Manager / AdSense) you will have to go to the relevant account section and set the following:
Navigate to: Privacy & Messaging → European regulations → Settings.
Ad Partners
Open "Review your ad partners" → "Automatically include commonly used ad partners" → Edit.
Leave the existing entries and verify that these ad partners are present, add any missing ones, then select Confirm and Save.
Common ad partners list:
- ADYOULIKE SA
- Aniview LTD
- ConnectAd Demand GmbH
- FreeWheel
- GumGum, Inc
- ID5 Technology Ltd
- Madinad Magnite, Inc. (Carbon AI Limited)
- Magnite, Inc. (Outstream)
- Marfeel Solutions, SL
- Marfeel Solutions SL (Compass)
- Media.net
- Membrana Europe BV
- OCM
- Ogury
- Outbrain Inc.
- Sparteo
- Triple13 Ltd
Also add any third-party tools used on the site (for example: glomex GmbH, Phaistos Networks, iPROM, Disqus).
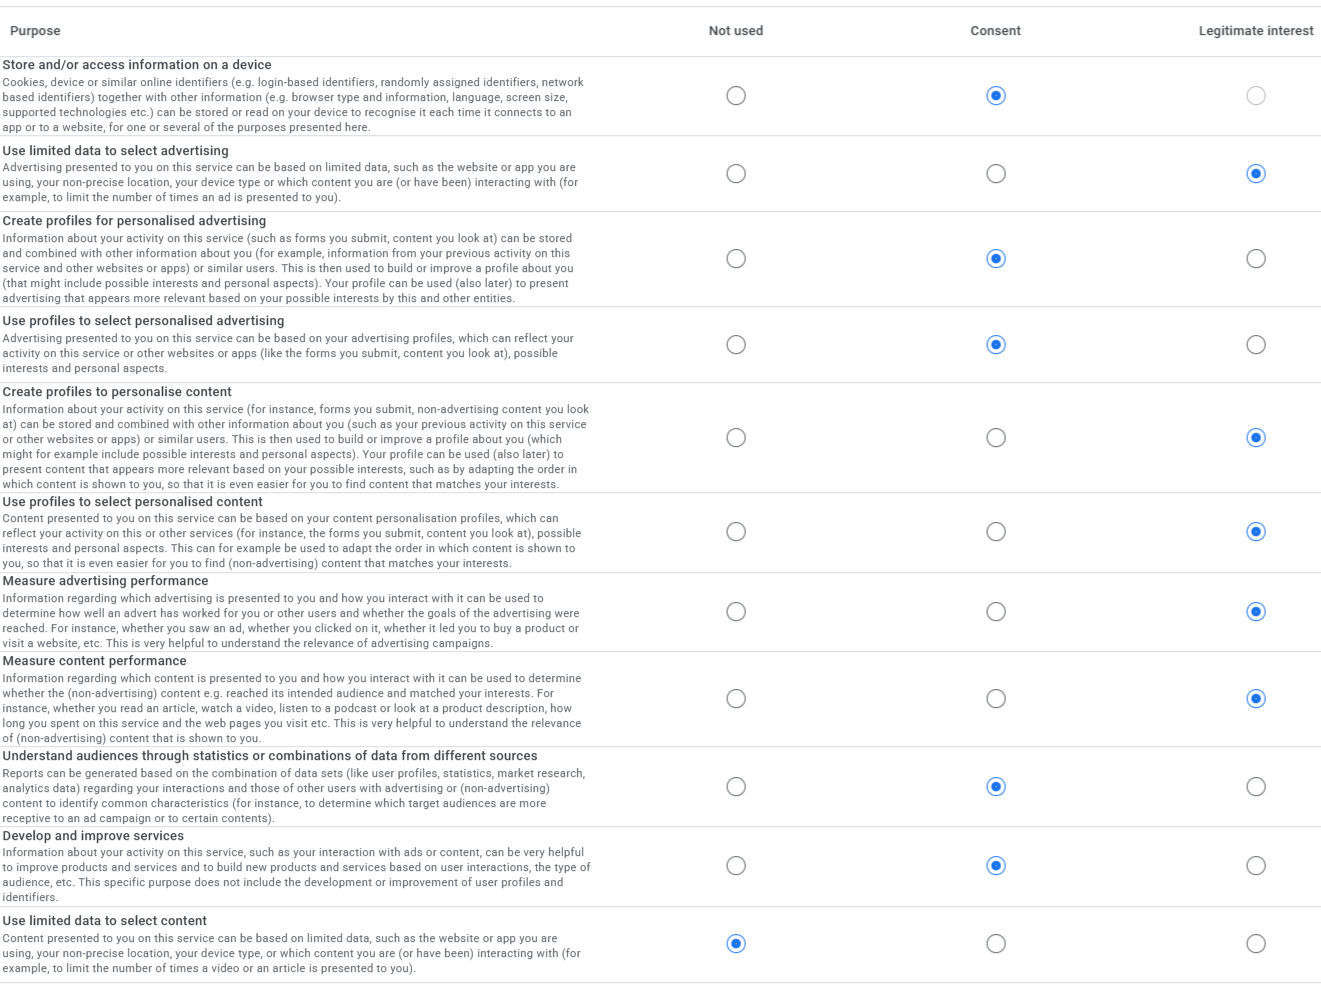
The remaining sections control how consent signals flow from Funding Choices into Google's advertising and analytics products, and which legal bases are available to ad partners when users decline some or all cookies. Configure each as described below.
Legitimate Interest
Under the IAB TCF framework, some ad partners rely on a "legitimate interest" legal basis for certain processing — typically measurement, fraud prevention, and product improvement. Turning these controls on allows those partners to keep processing data on that basis when users have not granted full consent, protecting ad revenue while remaining GDPR compliant.
- Legitimate interest controls: On
- Enable by default: On
Consent Mode
These toggles tell Google to honor the Consent Mode v2 signals (ad_storage, ad_user_data, ad_personalization, analytics_storage) that you initialized in the page snippet. Without them, the signals are sent by your tags but ignored by Google, and ad/analytics behavior falls back to default consent handling.
- Enable consent mode for advertising purposes: On
- Enable consent mode for analytics purposes: On
Add Purposes for Your Own Use
This section lets you declare additional first-party processing purposes — beyond the standard IAB TCF purposes — so Funding Choices can request user consent for them in the banner. Configure any additional purposes specific to your implementation, like this:
Save
Remember to click Save (bottom-left of the page) once all sections are configured.
Best Practices Checklist
- Verify whether
dataLayeralready exists - Place Consent Mode inside
<head> - Load Consent Mode before Google tags
- Initialize consent values as
denied - Use Consent Initialization trigger in GTM
- Avoid duplicate Consent Mode implementations
- Avoid duplicate
gtag('config') - Replace old UA IDs with GA4 IDs
- Review and confirm ad partners in Privacy & Messaging
- Configure Legitimate interest and Consent mode toggles
- Save changes in Privacy & Messaging
Additional Notes
Depending on your implementation, Consent Mode may be configured:
- directly in the website source code,
- through Google Tag Manager,
- or through third-party plugins/integrations.
Always verify the final implementation using browser developer tools or Google Tag Assistant to avoid duplicate tracking or consent conflicts.