Setting Up Web Push: Complete Guide
This comprehensive guide covers everything you need to set up Web Push notifications, from basic configuration to advanced customization.
Overview
Web Push notifications allow you to reach users even when they're not on your website. This guide covers:
- Basic channel configuration
- Permission prompt optimization
- SDK installation options
- Testing and verification
Time required: 20-45 minutes depending on customization
Prerequisites
- An OCM Pulse app created
- Site domain configured on your app
- Access to your website's code
- HTTPS enabled on your website
Part 1: Basic Configuration
Access Configuration
- Navigate to your app
- Click Channels in the menu
- Click Configure (or Settings) on Web Push
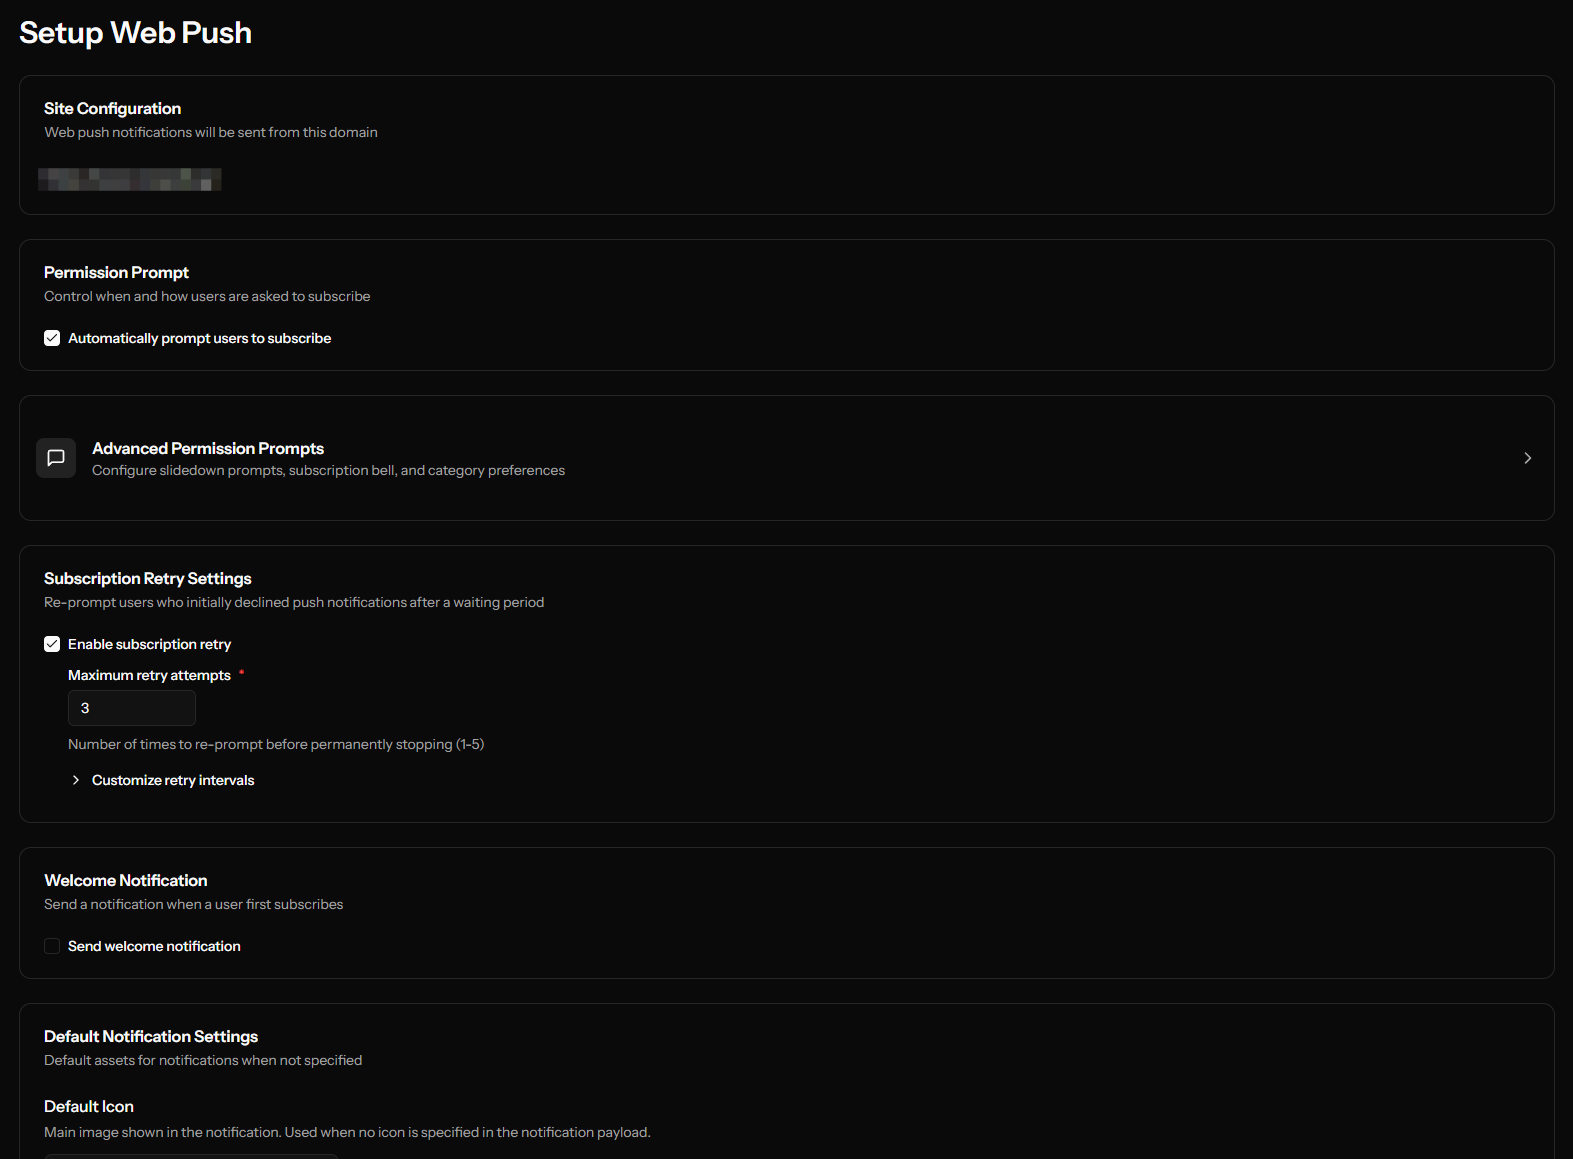
Essential Settings
Configure these minimum settings:
Auto Prompt
| Setting | Starter | Optimized |
|---|---|---|
| Enabled | Yes | Yes |
| Delay | 5 seconds | 10 seconds |
| Page Views | 3 | 2-3 |
Why delay? Users who engage with your content first are more likely to subscribe.
Welcome Notification
| Setting | Recommendation |
|---|---|
| Enable | Yes |
| Title | Short welcome message |
| Body | Set expectations |
| URL | Optional - relevant page |
Example:
- Title: "Welcome to [Site Name]!"
- Body: "You'll receive updates about [content type]"
Default Assets
| Asset | Size | Purpose |
|---|---|---|
| Icon | 256×256px | Main notification image |
| Badge | 96×96px | Android status bar |
Upload your logo or a branded icon. This creates recognition.
Save and Continue
Click Save to proceed to installation.
Part 2: Advanced Prompt Configuration
After basic setup, optimize your prompts for higher conversion.
Access Advanced Prompts
From the Web Push settings page, click Configure Advanced Prompts.
Prompt Strategy
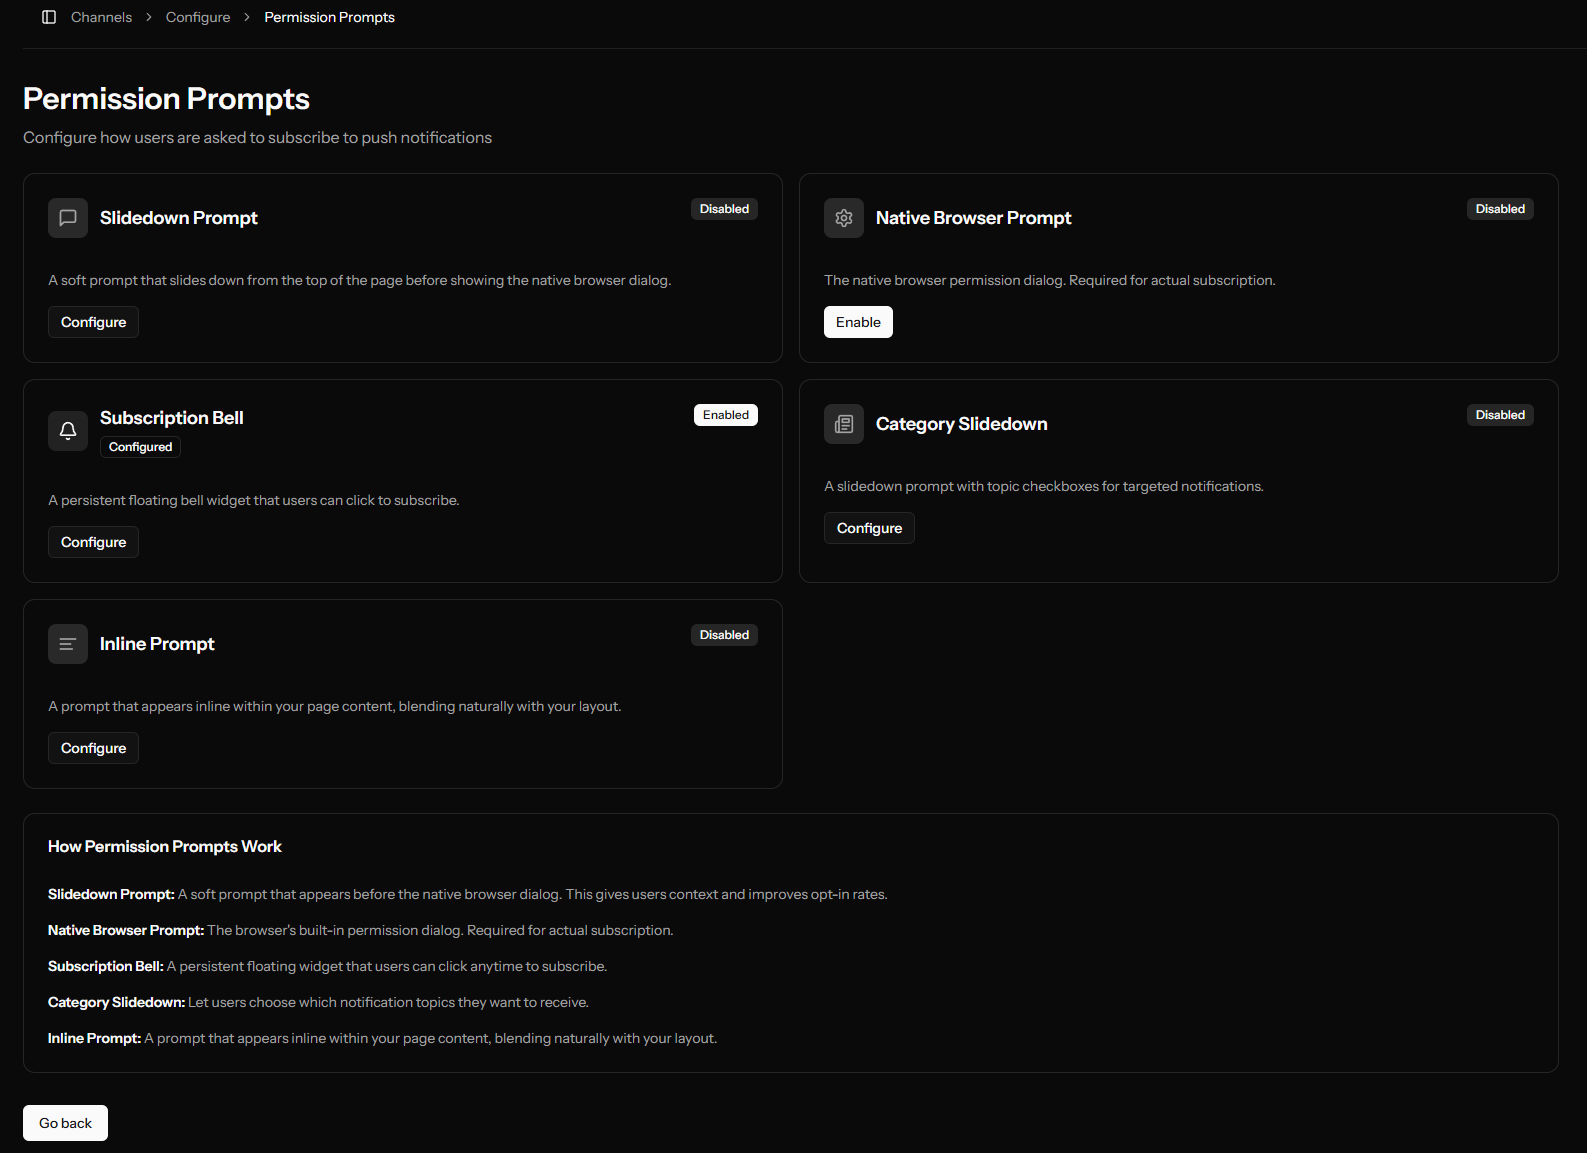
Native Only (Simple)
Just use the browser's native prompt.
- Pro: Simplest setup
- Con: Can only be shown once if denied
Slidedown → Native (Recommended)
Show a soft prompt first, then native if accepted.
- Pro: Can retry if declined
- Con: Extra step for users
Bell Widget (Passive)
A floating button users can click anytime.
- Pro: Non-intrusive, always available
- Con: Lower conversion than active prompts
Category Slidedown (Advanced)
Let users choose notification types.
- Pro: Higher trust, better targeting
- Con: More complex setup
Configuring Slidedown
- Enable the Slidedown prompt
- Configure timing:
- Page view delay: 2-3 pages
- Time delay: 10-15 seconds
- Customize appearance:
- Action message: Explain value
- Button text: Clear CTAs
- Colors: Match your brand
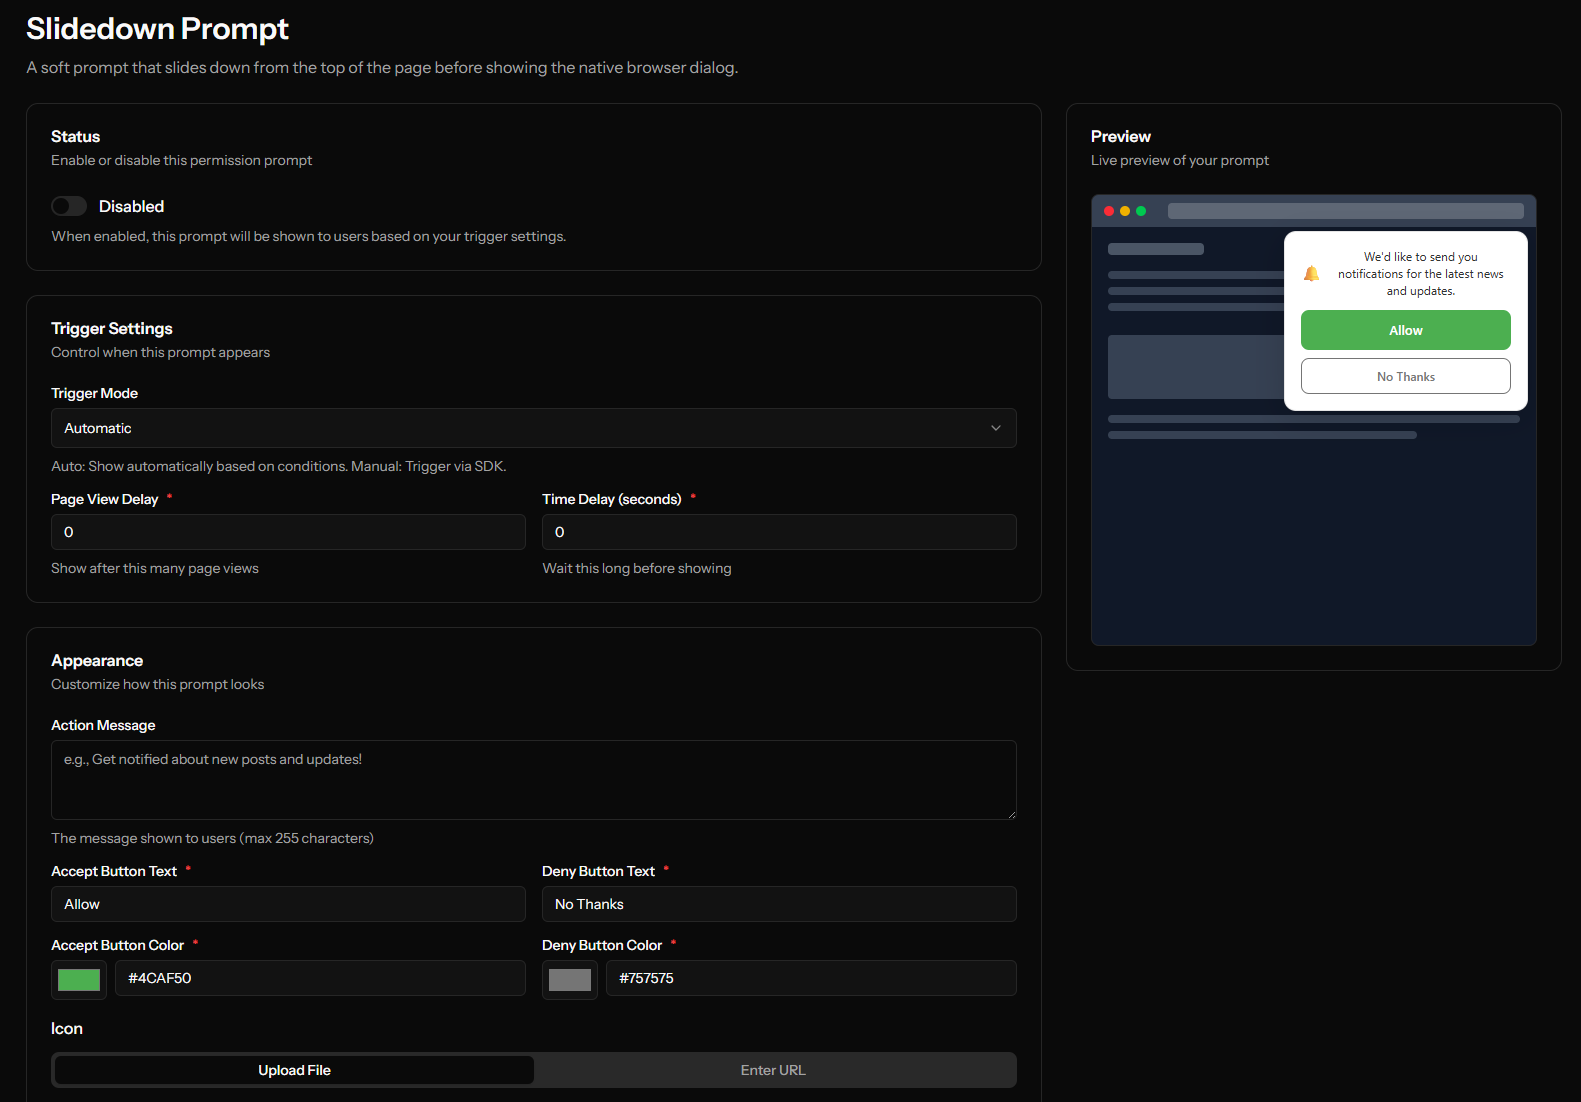
Example text:
- Message: "Get notified about new articles and exclusive content"
- Accept: "Yes, notify me"
- Deny: "Not now"
Configuring Bell Widget
- Enable the Bell prompt
- Set position: bottom-right (most common)
- Choose size: medium
- Optional custom icon
Configuring Category Slidedown
- First, create categories in Categories section
- Enable Category Slidedown
- Add categories to show
- Set default checked states
- Order by importance

Example categories:
- Breaking News (checked by default)
- Daily Digest (checked by default)
- Special Offers (unchecked)
Part 3: SDK Installation
Standard Installation
Step 1: Service Worker
Download and upload ocm-push-worker.js to your site root.
Verify: https://yoursite.com/ocm-push-worker.js returns the file.
Step 2: Add Script
Add to your HTML:
<script src="https://ocm-domain.com/sdk/YOUR-APP-ID.js" defer></script>
Best locations:
- In
<head>- Loads early but may delay rendering - Before
</body>- Loads after content, recommended
Platform-Specific Installation
WordPress
Option 1: Theme Header
- Go to Appearance → Theme Editor
- Edit
header.php - Add script before
</head>
Option 2: Plugin
- Install "Insert Headers and Footers" plugin
- Add script in Scripts in Header section
Shopify
- Go to Online Store → Themes
- Click Actions → Edit code
- Edit
theme.liquid - Add before
</head>
React/Next.js
// In your _app.js or layout component
import Script from 'next/script'

export default function App({ Component, pageProps }) {
  return (
    <>
      <Script
        src="https://ocm-domain.com/sdk/YOUR-APP-ID.js"
        strategy="afterInteractive"
      />
      <Component {...pageProps} />
    </>
  )
}
Use afterInteractive (or beforeInteractive if you need the SDK to boot earlier) so the script loads on every page view. lazyOnload can delay the SDK past the user's first meaningful interaction, which hurts opt-in rates.
Vue.js
// In your main.js or App.vue mounted hook
export default {
  mounted() {
    const script = document.createElement('script')
    script.src = 'https://ocm-domain.com/sdk/YOUR-APP-ID.js'
    script.async = true
    document.head.appendChild(script)
  }
}
Advanced SDK Usage
For programmatic control, use the data-manual attribute on the script and drive the SDK from the OcmPushInit callback queue. This is the only supported way to interact with the SDK from your own code — it is not based on DOM events.
<script src="https://ocm-domain.com/sdk/YOUR-APP-ID.js" defer data-manual></script>
<script>
  window.OcmPushInit = window.OcmPushInit || [];

  window.OcmPushInit.push(function (OcmPush) {
    // Show a custom subscribe button only if the user hasn't decided yet
    if (OcmPush.getPermissionStatus() === 'default') {
      document.getElementById('subscribe-btn').style.display = 'block';
    }

    // Wire your own button to a specific prompt
    document.getElementById('subscribe-btn').addEventListener('click', () => {
      OcmPush.resetPrompts().showSlidedown();
      OcmPush.run();
    });

    // React to changes
    OcmPush.on('onSubscriptionChange', (subscription) => {
      if (subscription) {
        console.log('User subscribed:', subscription.userId);
      } else {
        console.log('User unsubscribed');
      }
    });

    OcmPush.on('onPermissionChange', (permission) => {
      console.log('Permission:', permission);
    });
  });
</script>
See the full API reference in the Web Push Installation guide.
Part 4: Testing
Test Checklist
- Service worker accessible at root
- SDK loads without errors
- Prompt appears after configured delay
- Subscribing works (check in dashboard)
- Test notification received
- Welcome notification received (if enabled)
Testing Process
1. Fresh Browser State
- Use incognito/private mode
- Or clear site data: DevTools → Application → Storage → Clear site data
2. Monitor Console
- Open DevTools (F12)
- Watch Console tab for errors
- Check Network tab for SDK loading
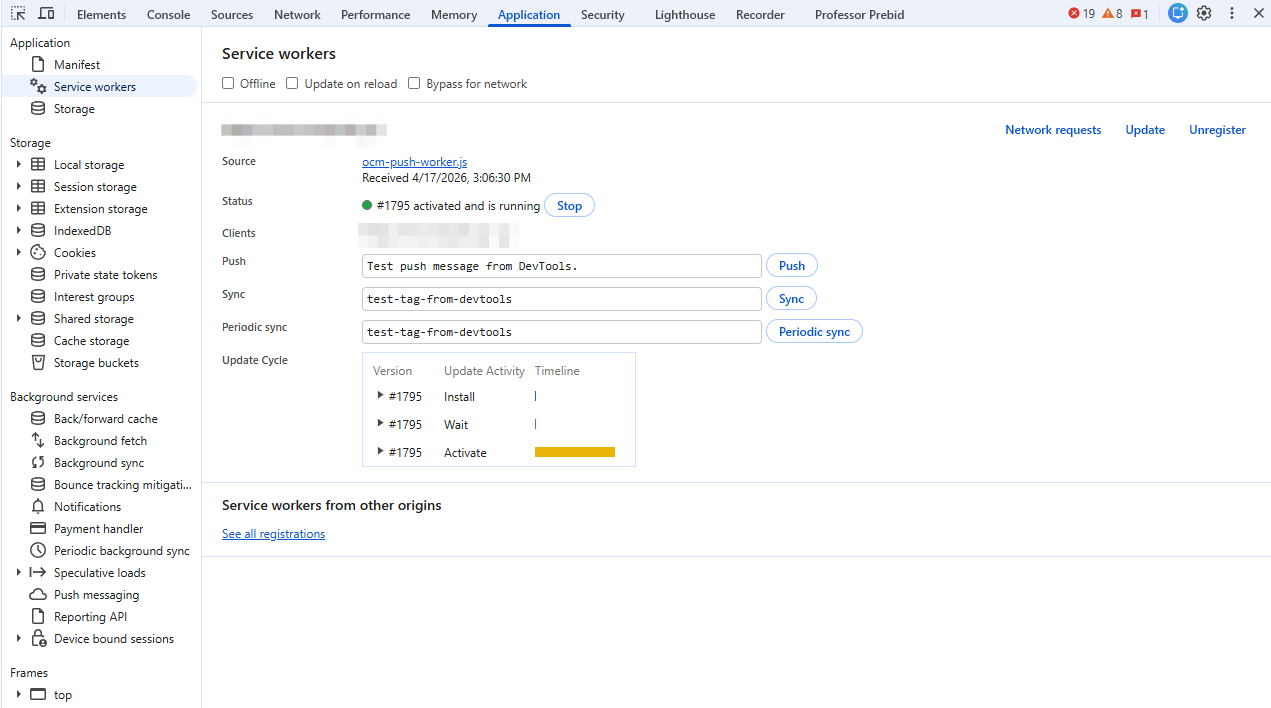
3. Verify Service Worker
- DevTools → Application → Service Workers
- Should show
ocm-push-worker.jsregistered
4. Test Subscription
- Allow the permission prompt
- Check OCM Pulse dashboard for new subscription
- Wait for welcome notification (if enabled)
5. Send Test Notification
- Create manual notification
- Verify it arrives
- Check delivery status
Common Issues
"Service Worker Not Found"
- Check file is at correct path
- Verify file contents (not HTML error page)
- Ensure HTTPS
"Permission Denied"
- User blocked notifications
- Clear in browser: Settings → Site Settings → Notifications
"Prompt Not Showing"
- Check delay/page view settings
- May have already responded
- Try incognito mode
Part 5: Optimization
Improve Opt-In Rates
- Delay the prompt - Users who engage first convert better
- Use soft prompts - Slidedowns explain value before native prompt
- Offer categories - Users trust you more with control
- Match your brand - Custom colors and messaging
- Time it right - After valuable content consumption
A/B Test Your Prompts
Test different approaches:
- Different delays (5s vs 15s)
- Different messaging
- Slidedown vs Bell
- With/without categories
Track opt-in rates and iterate.
Monitor Performance
Check regularly:
- Subscription growth rate
- Prompt impression vs subscription rate
- Welcome notification engagement
Summary Checklist
Initial Setup
- App created with site domain
- Web Push channel configured
- Basic prompt settings configured
- Default icon uploaded
Installation
- Service worker uploaded to root
- SDK script added to website
- Deployed to production
Testing
- Prompt appears correctly
- Subscription successful
- Test notification received
Optimization (Later)
- Advanced prompts configured
- Categories set up (if using)
- Prompt timing optimized
- Performance monitored